How to setup FreeStyle Libre 2 and OOP2 to use a native Bluetooth connection in xDrip+
- minimallooper
- Mar 2, 2021
- 22 min read
Updated: Jun 16, 2022

Summary
First a big THANK YOU to @tzachi-dar for developing this application so that all of us with a FreeStyle Libre 2 can enjoy receiving and calibrating readings without the need for a 3rd party device. You have made all of our lives more enjoyable.
How OOP2 Works
A method has been created that facilitates the process of starting a FreeStyle Libre 2 sensor with the official or even the patched version of the LibreLink app in a way that will permit xDrip+ to create a Bluetooth bond and receive encrypted raw blood glucose values from the Libre 2 sensor. This is accomplished by using an NFC scan to initialize the Libre 2 sensor via the official or patched version of the LibreLink app. After the 1 hour warm up period is finished, another NFC scan using xDrip+ will start the sensor initialization process in xDrip+. Selecting “Start Sensor” from the xDrip+ menu and then conducting another NFC scan about 60 seconds later will create a shared key that will be used to decrypt the encrypted Libre2 bluetooth readings.
A second application called OOP2 (Out of Process algorithm) is installed on the phone. Its purpose is to receive the encrypted raw values, which are collected by the xDrip+ bluetooth connection to the Libre2 sensor, and then decrypt these values in a closed source software version of the exact algorithm that exists in the hardware on the Libre 2 sensor itself.
Once OOP2 has decrypted the raw values, they are returned to xDrip+ to be calibrated and entered in the blood glucose table, plotted and displayed in the xDrip+ interface. At this point, that blood glucose value can be used (just like any other BG value from other devices or applications) with the internal xDrip+ calibrations (if you want to, but it is not required), broadcast to other applications (like AAPS) and used in plot predictions by retrieving the Libre 2 backfill sensor values history.
NOTE: A list of definitions exists at the bottom of this document. If you are unfamiliar with any terms or abbreviations feel free to jump below for clarification.
Configuration
Hardware
FreeStyle Libre 2 (FSL2, Libre 2) NOTE: US and Canadian versions are NOT supported
(OPTIONAL) FreeStyle Libre Reader
FreeStyle Libre Reader 1 (with updated firmware)
FreeStyle Libre Reader 2
NOTE: If you plan to use the FreeStyle Libre Reader in this solution, you MUST START the sensor with the READER FIRST. If you do not do this you will not be able to use the reader to gather readings from the activated sensor. After the sensor has warmed up, you can then take readings from the LibreLink application or xDrip+.
Software
OOP - Out of Process Algorithm, an external Android APK application that assists in retrieving raw Libre sensor data to obtain blood glucose values. xDrip+ sends gathered FSL2 BT raw data to OOP and blood glucose values are returned to xDrip+.
OOP1
Works with Libre 1 and Libre2 sensors.
2 versions of OOP1 - One for European Libre 2 sensors and another for Libre2 US Sensors
Retrieves values from Libre sensors and applies an algorithm to convert raw Libre sensor data to obtain corrected / calibrated blood glucose values.
NOTE: OOP1 has stopped working on most phones running Android 10
OOP2
Works with European Libre 2 sensors only
Closed source (not available on GitHub)
Purpose is to decrypt the encrypted raw Libre2 values and return them to xDrip+. Then xDrip+ is responsible for the translation and calibration of these values into usable blood glucose values.
Official version 2.5.3 latest version
Process
Before You Start
It is my strong recommendation that this process is done with a new sensor. While it has been reported that a connection can be made with a running sensor (see below), the chance that the LibreLink app or the Reader will create a new private share key for communication during connection is highly likely. This means that after bonding, xDrip+ is not aware of the new key and will not be able to communicate with the sensor. Attempt a connection with a running sensor at your own risk, preferably towards the end of the sensor's life.
First download and install the apps below
OOP2 - Versions of the oop2 can be found at:
There are 2 versions currently available. Version 2 has additional functionality to actively show the blood glucose levels it receives as well as the ability to operate without calibration when the xDrip+ setting is enabled.
oop2.apk - Version 1: 701239ac-2021.12.04 oop2.apk - Version 2: 70129ac-2022.01.21 (Uninstall this version if you have it. there were calibration issues. The link has been removed and please use the version below.)
oop2.apk - Version 3: 8a0ee8f-2022.06.10 (latest version)
xDrip+ - latest version can be found at:
Uninstall Possible Conflicting Apps
Some apps take control of Bluetooth functions and disturb the setup of the Libre 2 sensor. It is recommended to start by removing these apps if you have them installed. You can try to add them back one by one later. This list may grow in the future as more users check in. If you want to risk starting a sensor with the apps installed, it is your choice but be aware that removing them gives a better chance of success.
Amazon Alexa (UPDATE, no longer conflicts on Android 10 and newer)
Tile
UPDATE: With newer phone hardware and operating systems the responsiveness and connection issues seem to be significantly improved and thus are not nearly as effected, if at all, by this issue. Feel free to try using these apps with your installation after you have it working.
What if my sensor is already started? Can I still get reading in xDrip+? YES!
Many people have asked if this method can be used with an already active sensor and I can say with a resounding YES, you can start an actively running sensor.
FIRST, make sure you have made the configuration changes and settings to xDrip+ and installed and configured OOP2 as shown below.
THEN, proceed to Step 5 and MAKE SURE you have force closed LibreLink before you start. Then follow the process to completion.
NOTE: You will not be able to use your activated FreeStyle Libre 2 sensor with the FreeStyle Libre Reader IF IT was not started with the FreeStyle Libre Reader first. If it WAS started with the FreeStyle Libre Reader first, then you will be able to scan the sensor and retrieve readings from BOTH the sensor and apps like LibreLink and xDrip+.
How to Start a FreeStyle Libre 2 Sensor in Bluetooth Native mode using LibreLink and xDrip+
NOTE: If there are settings in the screenshots that are not called out with a BOX specifically and are UNCHECKED (IE, disabled) then PLEASE KEEP THEM DISABLED. The screenshots are reflective of a working configuration for ALL settings shown. If you want to experiment turning other features on/off after you have a working sensor, you are free do to so at your own risk.
Step 1: Application Installation and Configuration
Install and configure OOP2 and see that it works by just opening the app.

Settings
Use service on
Use foreground service on (optional)
This may need to be enabled if it is not working right away. This keeps the service open in the foreground
Timer Duration 5 min
This should be enough. Change to 1 sec if you are not getting results fast enough but be warned this increases battery usage.
Version 2: 93e5cac-2020.12.08 (latest version)

NOTE: There is a new key called "Apply xDrip calibration methods on OOP2 data." set it to false, and you will not be asked for calibrations.
More Information Here: Tzachi libre no calibrations
Version 1: 701239ac-2021.12.04

Install xDrip+ latest nightly version (link above). OOP2 functionality exists in xDrip+ starting after 13.12.2020. (Remember to backup your settings and DB, and uninstall the old version first). Further documentation on xDrip+ installation and setup can be found here.
Step 2: xDrip+ Settings Configuration
Hardware Data Source: Libre Bluetooth


NFC Scan features: settings not mentioned are assumed to be turned off. This applies to “faster multiblock” setting as well. Do not enable this as NFC scanning will NOT work.
Use NFC feature: on
Starting bluetooth connection with libre 2 sensor: Always connect to libre2 sensors
Sensor Age or Expiry: on
Scan when not in xDrip+: on


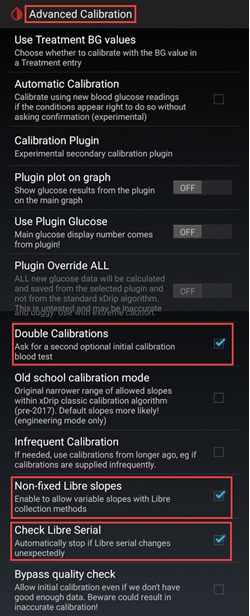
Less Common Settings -> Advanced Calibration
Double Calibrations: on (optional but recommended)
Non-fixed Libre slopes: on
Check Libre Serial: on

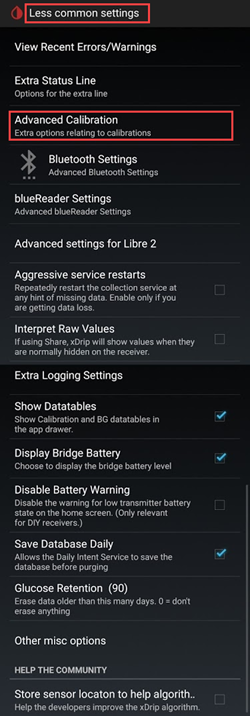

Less Common Settings -> Bluetooth Settings (these are important and can vary with your phone/setup)
Turn bluetooth on: on
Trust Auto-Connect: on
Use Background Scans: on
Always discover services: on
Allow bluecon unbonding: on
NOTE: Wakelocks, Close GATT and watchdog timers may be needed to be turned on if your phone needs aggressive BT resetting.


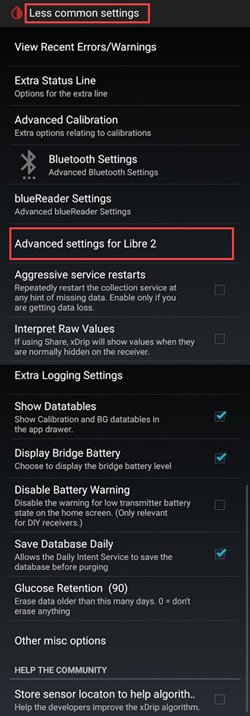
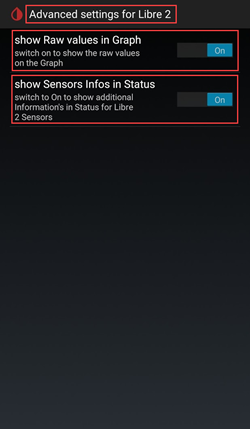
Advanced settings for Libre 2 (optional but helpful)
show Raw values in Graph: on
show Sensors infos in Status: on


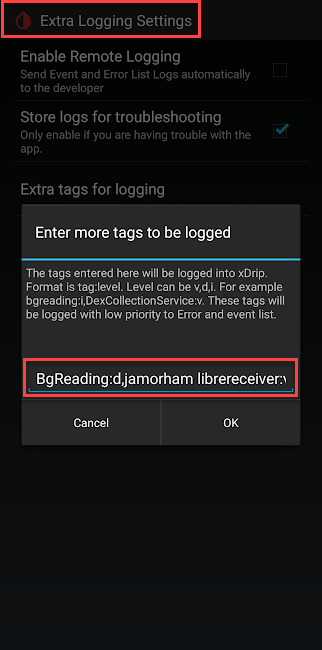
Extra Logging Settings (needed to debug if not working correctly)
Extra tags for logging: enter this value
BgReading:d,jamorham librereceiver:v,LibreOOPAlgorithm:v,jamorham nsemulator:v,DexCollectionService:v
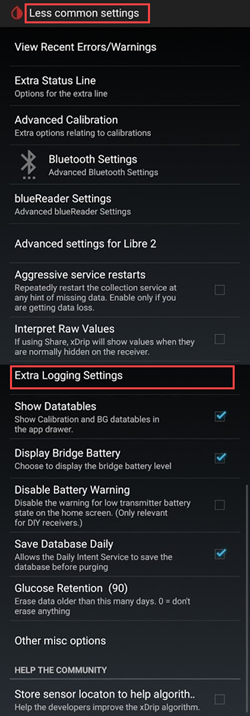

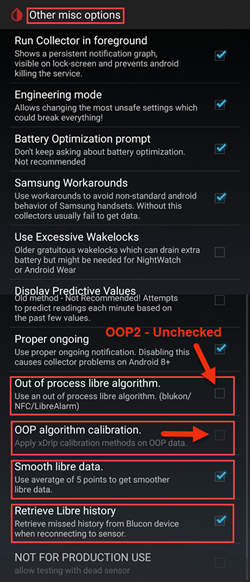
Less Common Settings -> Other misc options
Smooth Libre data: on
Retrieve Libre History: on
OOP algorithm calibration: THIS IS GREYED OUT AND CANNOT BE CHECKED, THIS IS NORMAL BEHAVIOUR


Settings for OOP2 Configuration
Out of process Libre algorithm: OFF
(MAKE SURE THIS IS OFF FOR OOP2 OTHERWISE YOU WILL NOT GET READINGS!)
NOTE for OOP2 Version 2 Users: There is a new key called "Apply xDrip calibration methods on OOP2 data." set it to False, and you will not be asked for calibrations.

Step 3: Physically insert the Libre sensor

Step 4: Start the LibreLink App and start sensor with very first NFC Scan
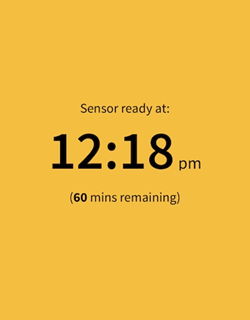
Start the LibreLink app, then scan the newly inserted sensor, then close and disable or uninstall the LibreLInk app. You still need to wait for the sensor to warm-up the full 60 minutes before proceeding and starting the sensor in xDrip+. It can be started as early as 20 minutes but I would not recommend this as the sensor is still internally calibrating and the values vary wildly.
Step 4a (OPTIONAL, Use FreeStyle Libre Reader):
Start the FreeStyle Libre 2 sensor by scanning it with the FreeStyle Libre Reader with very first NFC Scan
If you want to be able to use the FreeStyle Libre Reader as well as the LibreLink app or xDrip+ to read values from the FreeStyle Libre 2 sensor, then you will need to scan the newly inserted FreeStyle Libre 2 sensor with the FSL Reader FIRST. After the sensor warmup is complete you can then use the LibreLink app or xDrip+ to scan readings.
NOTE: The LL app is only needed for the VERY FIRST NFC scan after sensor insertion. It serves to send the warmup initialization signal, afterwards the app MUST be disabled (app settings->force close) or uninstalled. You can use the Patched 2.3 app, Official 2.4.2 or Official 2.5.3 versions, it does not matter. The main thing is to prevent the LL app from running when xDrip+ is trying to start the BT bonding process with the sensor as the LL app interferes with the bluetooth reconnection process by disrupting communication.
UPDATE: It has been reported that simply turning off the location permission in the LibreLink app Android system settings is enough to prevent it from interfering with the connection. This has been reported by a few users to be successful. Again I recommend disabling or uninstalling the app but you can try this if you want to experiment.


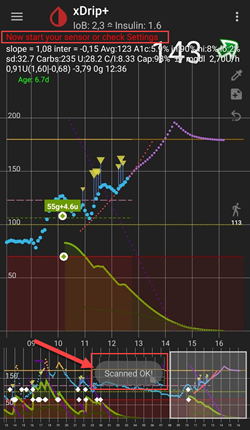
Step 5: Open xDrip+ and NFC SCAN the Libre 2 sensor
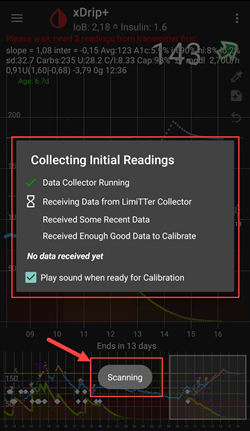
(Reminder! Ensure LibreLink is disabled (location turned off) or uninstalled AND you have waited the entire 60 minutes for the sensor to warmup and internally calibrate.) NFC SCAN the Libre 2 sensor. This sends a signal to the sensor to turn on Bluetooth pairing in order to start the bonding process. A small notification will appear briefly on the bottom of the xDrip+ Overview screen with the text Scanning followed by the notification Scanned OK! upon a successful NFC scan of the Libre2 sensor.


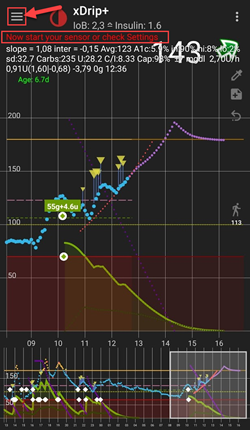
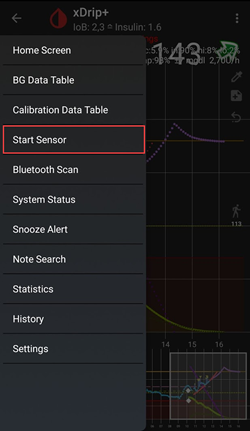
Step 6: Start the new sensor in xDrip+
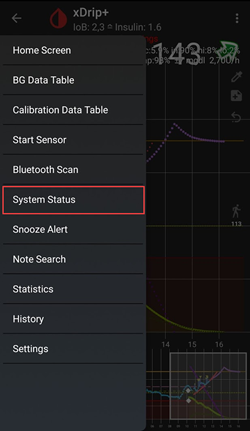
In the xDrip+ Overview screen press the hamburger menu in the upper left corner. Then choose Start Sensor.


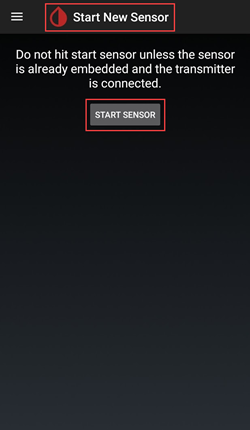
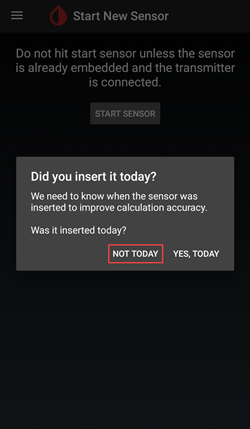
On the Start New Sensor screen press Start Sensor. A prompt will ask Did you insert it today? Respond by pressing NOT TODAY.
NOTE: If you accidentally clicked "YES, TODAY" then you will need to "stop sensor" from the xDrip+ main menu followed by "start sensor" by proceeding with Step 5 again.


Step 7: Wait 60 seconds and NFC Scan the sensor again
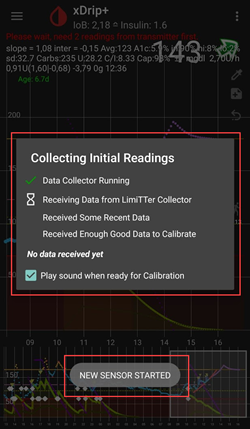
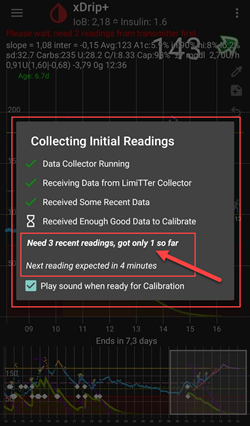
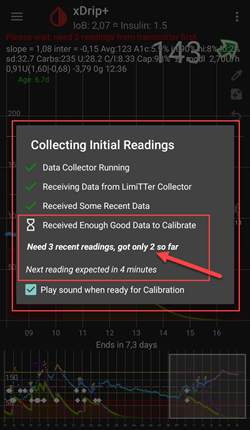
A second NFC scan is needed in order to ADD the sensor as the Bluetooth device from which xDrip+ will use to retrieve the readings. Once complete you will see a notification stating NEW SENSOR STARTED. The Collect Initial Readings dialog will appear displaying the steps completed and in progress along with time estimations for completion.


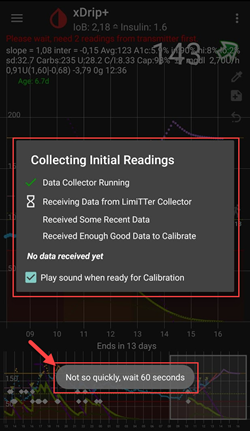
A 60 second waiting period is enforced because the sensor can’t be scanned during this process more than once per minute. If the sensor is scanned too early the warning Not so quickly, wait 60 seconds is displayed in the xDrip Overview screen.

Step 8: Data Collection between 3 and 15 Minutes
Between 3 and 15 minutes enough data is collected (3 full reading retrievals) and the Calibrate Sensor? prompt will ask you to enter an initial calibration. Press Calibrate to proceed through the initial calibration process. If you are still not receiving readings at this time, sometimes it helps to reboot the phone.


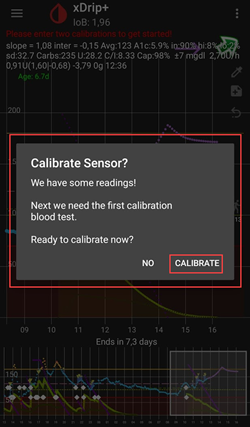
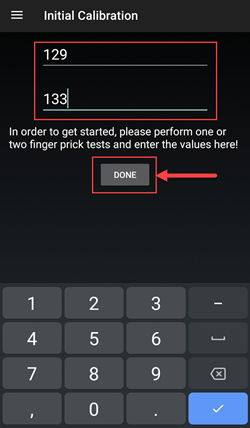
Step 9: Calibrate
When enough data has been collected to create 3 full readings, you will be prompted to enter your initial calibration. You must calibrate with an actual blood glucose reading from your blood glucose meter of choice, I use Contour NEXT One which has a very accurate MARD. If you have the double calibration option enabled in xDrip+ then 2 blood glucose readings will need to be taken. Enter each blood glucose reading result and press DONE when finished.

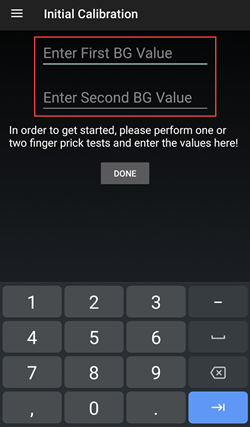

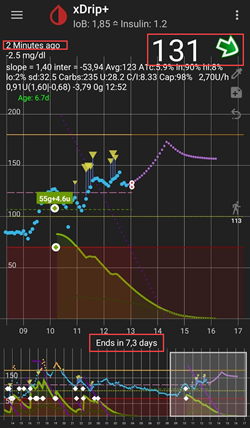
After entering the readings, your Libre 2 sensor is now bonded to xDrip+ as a Bluetooth device and will actively deliver readings at 5 minute intervals.

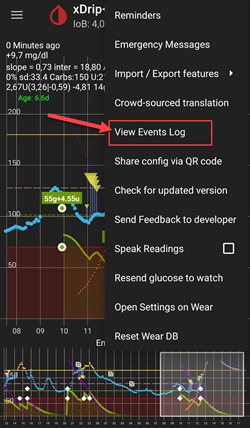
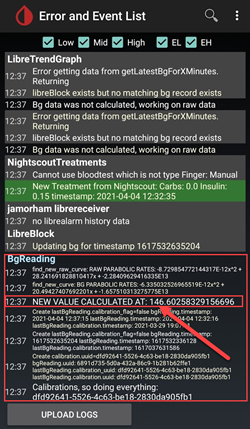
Readings are actively collected each minute and you can view them by pressing the 3 dot menu in the upper right corner of the xDrip+ Overview screen and selecting View Events Log.


Step 10: Verify Sensor is connected and delivering data
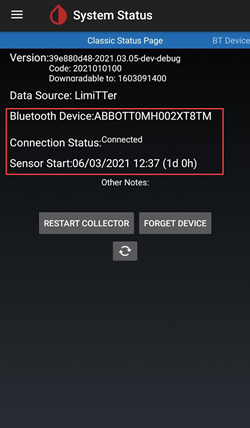
Press the Hamburger menu in the upper left of the xDrip+ Overview screen and select System Status. On the System Status screen the active Bluetooth Device: field displays the FSL2 Bluetooth naming convention of ABBOTTXXXXXXXXXXX, where the XXX’s represent the sensor serial number. The Connection Status field displays Connected and the Sensor Start: field displayed the time the sensor was started.


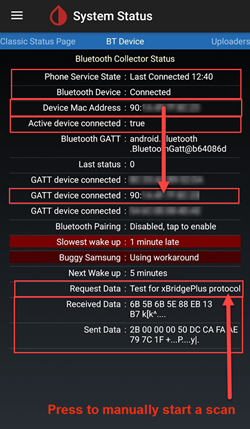
On the BT Device (swipe left) screen you can verify further connection details of the sensor as well as use this screen for troubleshooting connections. Below is a list of fields and their purposes to assist in connection troubleshooting.
NOTE: DO NOT click on Bluetooth Pairing in this window as your sensor has already been paried or is in the middle of the pairing and bonding process. Doing so will attempt a direct pair and you will have to start the process from Step 5 all over again.
Phone Service State: The last time the phone made a BT connection to the sensor
Bluetooth Device: Displays current status of the connection (either Connected or Disconnected)
Active device connection: Displays the status of the bluetooth bond after connection. True means the sensor is connected and bonded.
Device Mac Address: This is the hardware ID of the sensor
GATT device connected: This is the hardware ID registered in the Android BT service. Any bluetooth devices actively bonded to your phone will display their hardware ID here. The GATT and Device Address should match for your sensor hardware ID.
Request Data: Only shown with Engineering Mode enabled in xDrip+. Pressing Test for xBridgePlus protocol you can manually start a request for data from your sensor.
Received Data: This is a hexadecimal representation of the data stream coming from your sensor. If you see characters here then you are actively receiving data from the sensor. The data should change after pressing Test for xBridgePlus protocol.
Send Data: This is the data request hexadecimal stream sent to the sensor to start data retrieval. After pressing Test for xBridgePlus protocol you should see this field update however, the data may not change a the request is the same each time.

Notes
You can have OOP1 and OOP2 installed at the same time however, only one of the OOP applications will work based on the setting Out of process Libre algorithm set in xDrip+. It is my recommendation that you only use one and that should be OOP2.
OOP1 requires that the xDrip+ settings->Less common settings->Other misc settings->Out of process Libre algorithm is set to ON. For OOP2 this setting MUST BE TURNED OFF TO WORK (counterintuitive, yes but needed). When you install OOP2 the program may give a notification asking if you want this setting turned on, DO NOT Accept this notification, simply dismiss it.
Using LibreLink NFC Scans AFTER bonding/pairing in xDrip+ is completed: You can conduct NFC scans but the bonding/pairing process with xDrip+ needs to be completed first. Always look at xDrip+ and see if it is close to the 5 minute reading (ie. 4 minutes ago), if it is near 5 min, wait for the new BT reading to come in and then conduct the NFC scan. If you catch it at the wrong time it will disturb the BT process in xDrip+ and not receive BT readings, which can take a while to rebond and transmit again and sometimes a sensor BT connection can be “stolen” by LibreLink. However between these BT readings I have not had any problems executing an NFC scan followed by immediately disabling the app. I am not sure if LL needs to be disabled each time but I disable it to be on the safe side.
What is going on? When a Bluetooth connection is made a private shared key is created that is needed to allow communication between the sensor and the calling application/device. There is a high probability that the LibreLink app or the Reader creates a new private shared key for communication during the connection. This means that after bonding, xDrip+ is not aware of the new key and will not be able to communicate with the sensor.
UPDATE You can run the LibreLink App with xDrip+ with this LibreLink permissions change: Several users have reported that the LibreLink app can be restarted after successfully starting the sensor and receiving readers in xDrip+. In the LibreLink app Android permission you simply need to turn off the Allow Location setting. Once this is done you should be able to use the LibreLink app and xDrip+ simultaneously. I would recommend that you don't select a default app for NFC scanning and pick which app you want to read the sensor for an NFC scan. Also, DON'T FORGET, on your next sensor change to force close the LibreLink app after the initial warmup NFC scan on the new sensor. After the sensor is configured and receiving readings in xDrip+ you can then start the LibreLink app again.
Rebooting your phone: After the reboot, and after disabling or force closing the app, REMEMBER to check that the LibreLink app is NOT running. I suggest testing a reboot to see if LibreLink starts again automatically. You can look in the LibreLink app settings under Android Application settings on your phone. If it is still enabled, then disable the LibreLink app again, uninstalling the LibreLink app may be the only way to avoid this. This is to prevent LibreLink from accidentally stealing the BT bond. Also, after rebooting it will take the same 3-15 minutes to get BT readings from the sensor so be patient and plan for this if you are rebooting close to times you require a BG reading in order to bolus, meals, etc.
Battery Optimization settings: Make sure you EXCLUDE these apps from your phone’s battery optimization settings
xDrip+
OOP (1 or 2)
LibreLink
AndroidAPS (if you are using it)
2.4 GHz Wifi Routers: Some routers support both 2.4 GHz and 5 GHz broadcasting of their Wifi signal. BLE runs on the 2.4 GHz signal but avoids disruption if many devices are present on a channel by systematically jumping from channel to channel at different intervals. However, if you have the ability to turn off 2.4 GHz and only use 5 GHz in your area of use I would recommend it. Time to establish the first connection decreased significantly after doing this as well as periodic disconnects of the sensor. I have a lot of Hue lamps running in a small space and the Zigbee bluetooth network runs at 2.4 GHz. I assume this was the reason for my interference as a quick trip outside made connections MUCH faster. Every environment is different but if you are having problems I would suggest turning it off.
UPDATE: With newer phone hardware and operating systems the responsiveness and connection issues seem to be significantly improved and thus are not nearly as effected, if at all, by this issue.
Retrieving backfilled data can only be accomplished by NFC scan: Because Bluetooth readings only return a single value backfilling your sensor reading history can only be accomplished with an NFC scan. This is also useful if you lose the Bluetooth connection ( too far away from your phone for a long time, accidentally turned bluetooth off/on, rebooted phone). A simple NFC scan after a lost connection will help re-establish the Bluetooth connection as well as backfill the previous 8 hours of retrieved blood glucose values.
UPDATE: The latest version of xDrip+ allows for Bluetooth data to bring in not only the current reading but ALSO backfill history up to an hour prior. To get the full 8 hours of backfill history and NFC scan will need to be done manually.
Using Flight Mode: There are some situations which call for turning on flight mode (when taking a flight ;-), sleeping at night and you do not wish to have WIFI or Mobile connection signals operating with your phone in close range of your head) and this can cause issues with the Bluetooth communication during activation of Flight mode. When switching on flightmode on the phone followed by activating Bluetooth, blood glucose readings will be lost. The only workaround is to restart the collector in xdrip+ -> System Status -> Classic Status Page. After restarting the collector the blood glucose readings appeared again.
Troubleshooting
If you experience problems when trying to start the sensor or with an actively running sensor there are steps you can take to resolve them.
Contact the Gitter channel LibreOOPAlgorithm this is where the information for this blog post was gathered and peer reviewed. Many users are active in that channel that can assist with troubleshooting
OOP2 and FLS2 with xDrip+ Troubleshooting Guide Post on MinimalLooper.com
COMING SOON
Advantages
LibreLink patched app no longer required You no longer need a patched version of the LibreLink app to retrieve values from the Libre 2 sensor. While you can use the LibreLink patched app, the official versions of the LibreLink app can start the first NFC initialization scan in the same manner as the patched app. There is no difference as far as NFC initialization scanning to start the sensor is concerned.
3rd party NFC scanning device no longer required 3rd party NFC scanning devices such as (Miaomiao1 (MM1) [Firmware 39], Miaomiao2 (MM2) or Blucon) are no longer needed (but can still be used) to collect readings as the sensor alone can deliver them now via Bluetooth. Less hardware means less things to go wrong, less devices to charge and a more minimalistic setup.
You will still be able to NFC scan readings with the Libre 2 Reader (version 1 with updated FW or version 2) WHEN the FSL2 sensor has been started with the FSL Reader FIRST. The Libre 2 standalone reader can still be used to scan readings on the active sensor once it is bonded via Bluetooth to xDrip+.
You MUST start the sensor with the version first NFC scan to initiate sensor warmup with the FSL Reader FIRST. After this point other software applications will also be able to take NFC readings from the now activated sensor.
( It is my understanding that the Libre 2 sensor (as long as it has not established or is not trying to establish a connection) will always advertise its presence (and availability) over BLE exactly every 2 minutes (visible on any Bluetooth device that has the ability to scan for Bluetooth devices). Whichever device is first to respond to this advertisement wins the race and is the only device allowed to connect and read the sensor as a private shared key is created during the NFC scan connection process which is used to decrypt Libre2 communication. The sensor is then unavailable to other devices that do not have this private share key and might also be trying to connect. It seems that the Libre reader always wins this race whatever the “opponent”.
UPDATE: The Libre 1 reader can be upgraded to allow scanning of Libre 2 sensors. This is a perfect option because the Libre 1 reader does not contain a Bluetooth chip so there is no way it can interfere with the FLS2 Bluetooth communication. To upgrade you need to connect your Libre 1 reader to your computer via USB and run the upgrade programs below.
FreeStyle Libre 1 Reader Upgrade - Windows:
https://distributionstaging.freestyleserver.com/Payloads/fsfw/UpdateFreeStyleLibre_248_159.exe
FreeStyle Libre 1 Reader Upgrade - Macintosh:
https://distributionstaging.freestyleserver.com/Payloads/fsfw/UpdateFreeStyleLibre_248_159.zip
NOTE: your Libre 1 reader software version must be 2.2.9 or later to upgrade to version 2.4.8 (contains the functionality to read FSL2 sensors). Unfortunately mine was too old at 2.1.2. You can contact Abbott support to get a newer Libre 1 Reader if this is the case
Minimal hardware device setup My goal has always been to keep the medical devices attached to my body at a minimum. The Libre 2 in combination with the Omnipod system accomplished this goal (and with availability of DASH in the future, only those two devices will be needed). This point is even more crucial when I travel (both short and long distances) because the number of items and set changes for those items becomes fewer, which means I have more room for other items in my luggage. Hopefully in the future there will be a patch pump that just has a replaceable reservoir and the chip and motor system can be packaged as a retainable/reusable piece. This would cut down on waste and decrease packaging for site changes which again leads to more room in my suitcase for other things.
No more hour gaps when changing sensors Because you can start another sensor with the LibreLink app using an initial NFC scan, the current sensor can keep running and delivering readings by Bluetooth at the same time. After 20 minutes you can get readings from the new sensor but it is best to wait 1 hour for the sensor to properly internally calibrate. This means you can stop the current sensor and start up the new one (after it has been set and warmed up with the LibreLink NFC scan an hour earlier) and within 3 to 15 minutes you will have your initial calibrations and readings. Check out my other article on Libre 2 sensor insertion and calibration best practices [INSERT LINK].
Use of OOP2 REQUIRES Calibration Unlike OOP1 (which does not support calibration), when using OOP2 you are now required to make an initial calibration in order to start the sensor. This can be a single or double calibration (if you have enabled that option). This added feature solves the problem with the official LibreLink app or official Libre Reader which would report a value of LOW, when the actual blood glucose was near 100 mg/dL. The LibreLink patched app allowed for limited calibrations in a range of 20 mg/dL around the returned raw BG value. This is because Abbot stops returning a value if it is below 40 mg/dL. Since calibration is not possible in either the official LibreLink app or the Reader, inexact values would be returned (which made looping impossible). Now OOP2 forces a calibration in order to start the sensor to ensure that returned values accurately reflect actual blood glucose values.
Disadvantages
Phone Reboot: Because the Bluetooth process has to start again when your phone reboots, you have to first ensure that you manually disable the LibreLink app (if you did not uninstall it) and be patient for the first readings to come in (3 to 15 min). This means timing phone reboots so they do not occur during critical times like correction boluses or meal and snack times.
You can't run LibreLink and xDrip+ in parallel together for Bluetooth readings. LibreLink will always try to "steal" the Bluetooth connection to the sensor and bond. If that happens, you are stuck with LibreLink for the rest of the life of the sensor. So running the apps simultaneously does not work all the time. As I mention below, you can enable the LibreLink app and do an NFC scan to get the LibreLink reading (if you need to compare, want to retrieve history for yourself or endocrinologist reports) however you should disable it as soon as you have your reading and not try to attempt this within a minute of when xDrip+ is going to retrieve its Bluetooth reading. I am not sure how using the Libre 2 reader works while doing this but I will test that at a later point.
UPDATE You can run the LibreLink App with xDrip+ with this LibreLink permissions change: Several users have reported that the LibreLink app can be restarted after successfully starting the sensor and receiving readers in xDrip+. In the LibreLink app Android permission you simply need to turn off the Allow Location setting. Once this is done you should be able to use the LibreLink app and xDrip+ simultaneously. I would recommend that you don't select a default app for NFC scanning and pick which app you want to read the sensor for an NFC scan. Also, DON'T FORGET, on your next sensor change to force close the LibreLink app after the initial warmup NFC scan on the new sensor. After the sensor is configured and receiving readings in xDrip+ you can then start the LibreLink app again.
3rd Party NFC Scanning Devices can still be used. Yes, I listed this as a disadvantage but I also wanted to point out that if something goes wrong with the sensor and LibreLink captures control of it, you can always fall back to placing an NFC scanning device on the sensor to get readings in xDrip+. You can also use this device instead of a direct Bluetooth connection if you are more comfortable with a setup consisting of a 3rd party NFC scanning device (Miaomiao, Blucon). Sometimes certain phones do not operate well with the native Bluetooth sensor bonding and data retrieval. You can use these devices as a backup or as normal usage, either way you still have this as an option.
If you are planning on using the FSL Reader as an NFC scanning device to take readings, you MUST start the FSL2 sensor with the VERY FIRST NFC scan to warm up the senor with the READER FIRST.
LibreView data will not be uploaded automatically Since the LibreLink app does not have a constant Bluetooth connection (because LibreLink should not be running simultaneously with xDrip+ once the sensor is actively sending bluetooth readings) then it is not receiving readings automatically from the sensor. This means that blood glucose data is not automatically being uploaded to LibreView and by extension other phones with LibreLink. I mark this as a disadvantage as I know many parents rely on this functionality as well as those that are forced to use the LibreView reporting for their healthcare provider. You can still open the LibreLink app and scan every 8 hours to get the back-filled data from the sensor into LibreLink (3 times every day [at least every 8 hours] but more scans would likely be needed to capture all 24 hours of data) but again this is a manual process.
Use of OOP2 REQUIRES Calibration While this is mostly viewed as a feature addition some people may view forced calibration as a disadvantage. There are times when a sensor needs to be replaced under less than ideal conditions. This means your blood glucose may not be in the flat stable values needed for ideal calibration, however you still need SOME readings to have a general idea of where the BG is and where it is trending until it can stabilize for calibration. Other times the sensor may not be as accurate as others but it is still functional. It will take many calibrations and some time (8 hours to a few days) to arrive at a reliable slope and intercept returning accurate adjusted values..
Definitions
BT - Bluetooth
BLE - Bluetooth Low Energy
FSL - FreeStyle Libre, abbreviation for the CGM sensor produced by Abbott. Can appear as version 1 (FSL1) or version 2 (FSL2)
Libre 1 (FSL1) - NFC only. First version of Libre sensor
Libre 2 (FSL2) - Bluetooth and NFC. Second version of the Libre sensor.
Libre 3 (FSL3) - Bluetooth and NFC. Third smaller version of the Libre sensor. Currently not released.
LL - LibreLink, application used to start the Libre sensor with initial NFC scan
MM - MiaoMiao, name and manufacturer of a 3rd party NFC scanning device that delivers readings via bluetooth to xDrip+.
NFC - Near Field Communication, a physical operation in which you bring the NFC sensor on your phone close to your Libre sensor to start a reading. This is often referred to as “scanning the sensor”, a “sensor scan” or “NFC scan”. This process in no way uses Bluetooth.
OOP1 - Out of Process Algorithm version 1, the 3rd party app that receives raw values (delivered to xDrip+ from the Libre sensor [by bluetooth or NFC scan]) and then uses an algorithm (very similar to the hardware algorithm on the sensor chip) to process the raw values and returns a calibrated (by the OOP1 algorithm, not by xDrip+’s native calibrations) blood sugar back to xDrip+ to either display or be further processed with xDrip+’s calibration (with a finger pick blood calibration) if needed.
OOP2 - Out of Process Algorithm version 2, the 3rd party app that receives encrypted data delivered to from the Libre2 sensor (by bluetooth or NFC scan) and then decrypts the encrypted data. Once decrypted, the data is then sent to xDrip+ for further processing, such as calibration.
Special thanks to everyone who helped me in editing this post for both correctness and grammar, I could not have gotten it to this point without you.
@tzachi-dar - for the many reviews you did and patiently answering my numerous questions. I learned a lot through this project about BLE, FLS2 communication and Android Development.
@robrub - for the many many corrections and bringing my grammar to a new level
@jawbreaker - thank you for the corrections and suggestions!